


Week 5: Sculpting in ZBrush, Cont.
- Manan Sarkhedi
- Dec 13, 2022
- 4 min read

Week 5 was a continuation of week 4 where we were taught zbrush and character design by Carlo Bautista. He taught us the basics of character sculpting and some tips to keep in mind while making a character. Sculpting a character can be divided into three stages - primary, secondary and tertiary.
Primary stages include blocking and adding the basic features. Secondary stage adds a bit more detail where the character starts looking the way it's supposed to. Tertiary details are the minute details like the skin pores and things that give a finished look to the model.
We were told a few things to do during the primary stages of character design:
Use primitives (basic geometry)
View it from all angles
Keep the polycount low
Use the character sheet (orthographic views of a character)
During the class I learnt about the W + Y for transpose tool which felt similar to gizmo tool but worked differently. I mainly used it to stretch and squeeze object but didn't explore it much.


We also learnt a few tips about learning anatomy to make characters and were recommended a book called Anatomy for sculptors by Ultis Zarins. It had few important tips and facts that would help us to know proportions better. I learnt how the size of a palm is proportionate to the face which blew my mind.
We had to take the things we learnt and explore the anatomy of a human or use references to make realistic lips. I did try to make lips and clearly they didn't turn out to be very good. One of the things that I should have done is use more reference as I only used the front view and didn't take into account the depth.


This exercise was mainly to help us better understand the anatomy of a person. We had to select different parts of the body and try to identify the body parts and give this model a closer look.


While I learnt quite a few of the names and places in the body, I definitely feel the need to dedicate some more time to this.
In my independent study hours I started on on my old man again to finish it. I learnt about a few more tools while making this model like the trim rectangle and trim lasso tool. I learnt how to make clothes using the extract tool and masking. after I was satisfied with the blocking and the basic details, I experimented with the cloth brushes in zbrush. They are fine but I didn't like them too much because they are not very precise. I also tried using the Alpha brushes for skin pores. But I ended up not using them too much in this model. But I know I am using this for the final model.


Self Critique - The tie was just made using move tool and I did not know how to make it in a better way and the collar needed to look a bit more like a collar. The wrinkles on forehead and the eyebrow portion needed some more work and I should have given the character a t-pose.


After my old man i was having too much fun wih zbrush and wanted to make another model. So I found this crazy pigeon on pinterest that taught me lot.
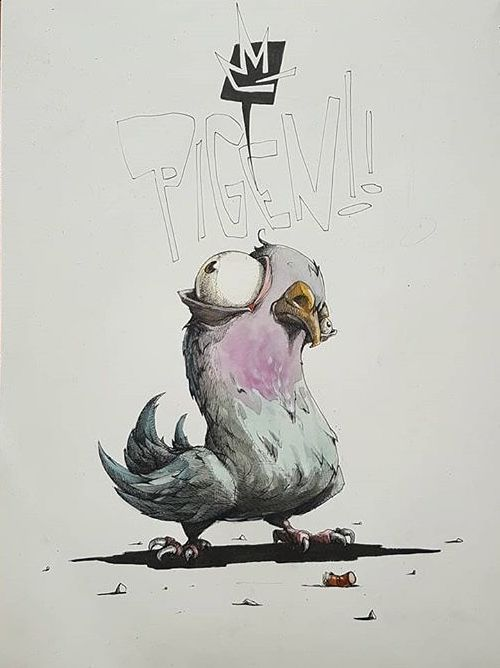
Federica Saletta: Azram pigeon illustration
The main challenge with this model was the reference itself. It was a great illustration but not that good of a reference. But I liked it so just went ahead and started making it. The first problem i had to solve was the how I would make the pose. But with a bit of trial and error I made it mainly with move tool. The next problem was the feathers on the body, which I initially was going to make manually, but I found a great tool called insertmesh that allows you to make your brush and you can make a few mesh feathers and apply them on the body. This was really useful.


I also learnt about the Sculptris Pro mode which allows you to add polygons to add really minute details at the cost of really increasing the polycount, and snake brushes to pair it up with that basically lets you do this:

The feet also took quite a lot of time to figure out, but at the end I liked how they turned out and the rest was relatively quite simple to make .

At the end I also tried decimation master that we were taught in the support session which basically lets you remesh an object to a specific polycount while also maintaining the shape. But it does triangulate the entire mesh.
Self Critique - Because I was trying to make the pigeon just like the reference I ended up messing up the symmetry in really initial stages. Should not have done that. It just made modelling this harder. Also I got a little lazy in adding the feathers and details, so I doubt I will ever complete it, but it was good practice and fun to make.

Comments